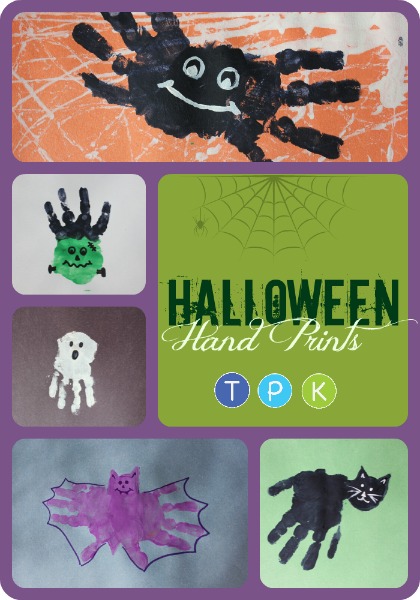
Halloween Handprints

![]()
 for Toddlers, Preschoolers, & Kinders

With Halloween right around the corner, here are some fun Halloween handprint ideas to do with your kids. Below are pictures of handprints with a Halloween theme. With a few, I have added an extra element in case you are doing the project with older children who might want to do a little more then a handprint.
———————————————————————————
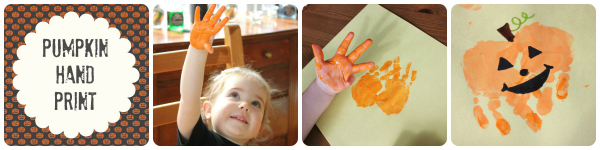
For this fun little pumpkin, all you need is two little hands, a piece of paper, some orange paint, and markers.
Start by covering one hand with orange paint and making a print on your paper. Next, paint the other hand to make the other side of the pumpkin. When making your second print make sure your fingers cross a little bit. After it dries, add a little stem and a cute jack-o-lantern face.
Tip: For older children you can cut out the face pieces from black construction paper and have your child glue on their own jack-o-lantern face.
———————————————————————————
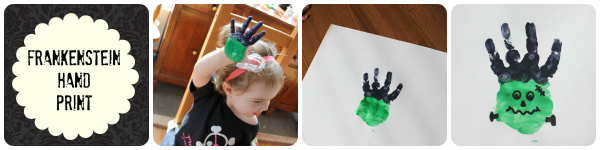
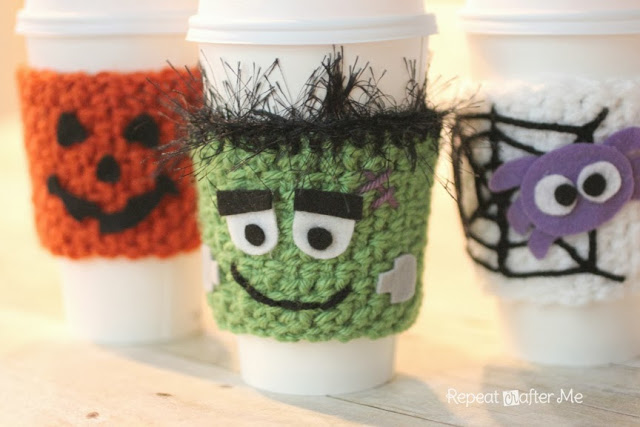
For this funny Frankenstein you will need just one little hand, green and black paint, and a black maker.
Start by painting the palm of the hand green. Next, paint the fingers and the top of the palm with the black paint to make Frankenstein’s hair. When your hand is all painted make a print on your paper and wait until its dry. When dry, add a funny face, some stitches, and, of course, bolts.
———————————————————————————
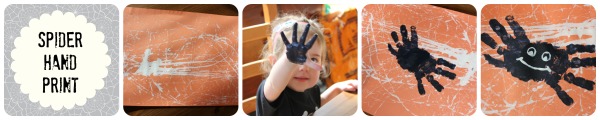
This cute little spider is a two part project (if you want it to be.) You can either do just the spider print on a piece of paper, but if you need a little extra, the marble painted spider web is lots of fun.
Here is how we did it.
For the marble painted spider web:
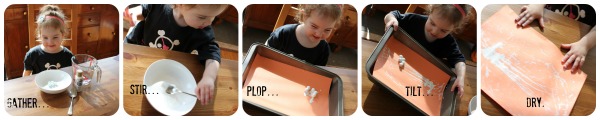
What you will need: marbles, white paint, bowl, spoon, water, flat box or pan, paper
Start by putting some white paint in a bowl, add a little water and stir. The water will help thin out the paint a little so the marbles can move more freely. When your paint is mixed add in your marbles, using your spoon move them around until they are coated.
Next ,have a pan or flat box ready with a piece of construction paper in it. Plop your marbles on top of the paper. Have your child grab each side of the box or pan and tilt it back and forth, side to side. A fun web design will appear. When you child is done, remove the paper and allow to dry before adding your spider handprint.
For the Spider Handprint.
All you will need is your piece of paper (marble painted or not) two little hands, black paint, and white paint for the face.
Start by painting one hand, minus the thumb, black and making a print on the paper, next paint the other hand. When making the second print make sure that the bottom of the palms of the hand are touching to make the spiders body.
Let your little spider dry, when it’s done, you can paint on a cute little face.
Tip: For older kids you could also have googlie eyes they can glue on themselves. You can talk about spiders and how they have eight eyes, count out eight and have fun gluing.
———————————————————————————
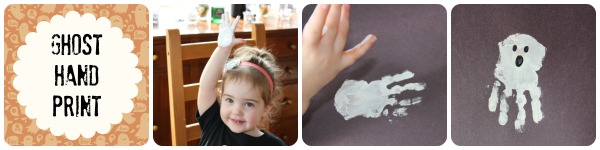
For this spooky ghost all you will need is: one little hand, a piece of paper, white paint, and a black marker.
To make the ghost, paint the hand white, making sure to skip the thumb, just painting the palm and fingers. Once your little ghost is dry, have fun making a spooky ghost face with black maker.
———————————————————————————
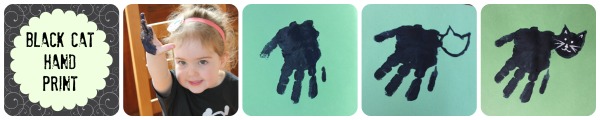
For this cute black cat all you will need is: one little hand, a piece of paper, black paint, and white paint to make the cat’s face.
To make the cat, paint the hole hand black and make a print on your paper. When dry, the thumb will be the cat’s tail. You will need to add a head on the other side of the hand. I outlined it first, then painted it in. When your head is dry use the white paint and a small brush to make a cute little face.
Tip: A way to make this craft a little more fun for older kids, pull out the craft sticks. Have fun making a fence for your cat to walk on by making a fence out of craft sticks and glue.
———————————————————————————
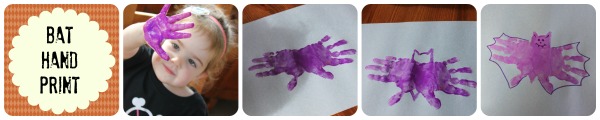
For this bat all you will need is: two little hands, paint (any color, she wanted purple), and a marker.
To make the bat, start by painting one hand and make a print. When printing the second hand make sure the thumbs are down, these are the bottoms of the wings, and then have the bottom of each palm touch. Let your little bat dry. When it’s dry, add a head and bottom. Again, I started by outlining the bat body and then filled it in with paint. When the body is dry you can outline the wings with the marker and add a little face.
———————————————————————————
I hope you and your little ones have as much fun doing these Halloween hand prints as little Lou and I did.
Just remember to have fun with it!

Click images to buy via Amazon (affiliate)


 ABOUT KATIE: Katie spends her days with toddlers, as their preschool teacher. She loves to bake, cook, camp, and read, but she her greatest love is creating crafts and sharing them with kids. Katie and her newlywed husband are living happily ever after on a little island in the Pacific Northwest where she was born and raised. Keep your eyes open for her posts on Bonbon Break, where she will be a regular contributor.
![]()
This post was written by Katie Myers exclusively for Bonbon Break Media, LLC