Superhero Cape Tutorial

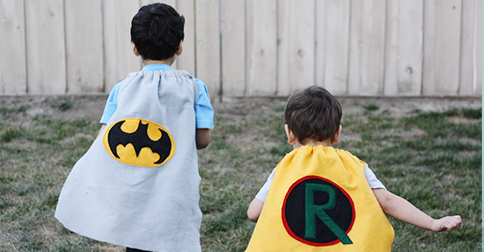
Any boy’s mom can tell you that capes are an integral part of little boy life. My boys have lots of them, in all different colors, because sometimes you need to be Batman and sometimes you need to be Harry Potter – just depends on the day. Cape collecting can get pricey, though, and the kind you buy in stores aren’t always very well made. Enter felt superhero capes.
The first set of capes I made were costume satin, but I learned quickly that the time spent making capes decreases exponentially when you use felt. Seriously, it’s my favorite fabric for sewing. It’s inexpensive, pinning is optional, and it’s totally washable. Doesn’t get better than that.
My biggest concern with boys and capes are the ties. Cape-wearing activities can get a little (or a lot) crazy and sometimes involve acrobatics. Adding things tied around the neck to that mix just doesn’t seem wise to me. Thankfully, my sister had a genius plan to avoid neck tying but keep the superhero feel – elastic armbands. Perfect.
So these capes are extremely budget-friendly, pretty darn safe and super fun for kids of all ages. They have become our go-to gift for birthdays and are perfect for the ever-changing preferences of little ones. Best part? They are equally fun for boys and girls. And when I tell you that ANYONE can make them, I’m totally not exaggerating.
What you need:
18×24 piece of felt
6-8 inch piece of ribbon
2 small pieces of elastic
felt scraps
coordinating thread
What you do:
1. Along the short side, fold felt over approximately 1″ and pin. Sew seam with the outer edge of presser foot aligned with the raw edge of the folded fabric.
2. Using a bodkin (a safety pin or crochet hook would also work), insert ribbon through tube created. Gently pull through until bottom edge of ribbon aligns with the felt edge. Pin place and then sew back and forth over felt and ribbon 3-4 times.
3. Continue to pull the ribbon through, gathering the fabric as you go. Pin in place when the top edge of ribbon reaches the fabric edge. Sew as with the other side.
4. When you’re done, the top (neck) edge of the cape will look like this.
5. Flatten out the gathers on one side of the cape. Pin on elastic – one end at the base of the fold, about 1/2″ inch from the outside edge, the other about 4″ down, 1″ from the edge.
6. Sew each end making two seams, each with 3-4 passes of the machine. This should keep the elastic secure.
6. Repeat with opposite side. The front side of the cape should now look like this on each side.
7. With front side of cape facing you, fold the top under to place your applique. These can be any shape or letter that you want. I generally freehand them but you could definitely create a pattern using clip art and text on your computer.
8. Pin top part of applique to bottom (if using two layers) and sew around to attach.
9. Pin applique to cape and sew.
10. And that’s it! You’re done.
See? Super easy! And if you don’t have a sewing machine, you could definitely do the stitching by hand – there isn’t much of it. Good luck and happy cape-making!