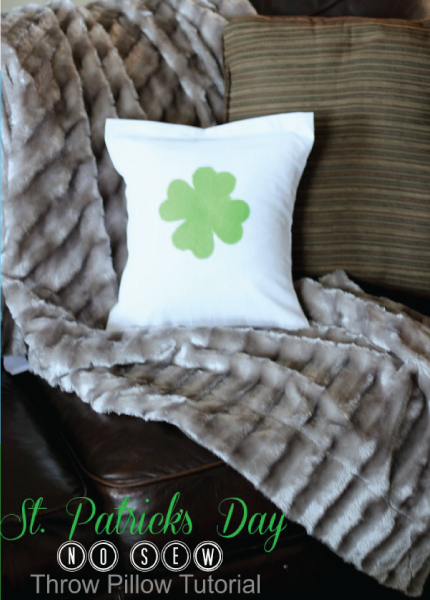
St. Patrick’s Day No-Sew Throw Pillow by PinkWhen

![]()

First of all, I love decorating for all of the holidays. When I was growing up my mom decorated for certain holidays, and I always remember having fun parties at school as well. I try my best to make some sort of statement and celebrate every little holiday and occasion that I can, and the kiddos all seem to enjoy it.
Sometimes, I will go all out for a project, and then other times I like to take the easy way out. This would be one of those projects! By “easy way”, I mean I don’t have to unpack my heavy sewing machine and clear off a spot. For this project, we are going to skip sewing and go straight to ironing!
St. Patrick’s Day No Sew Throw Pillow

Supplies needed:
- Ultra-Hold Heat -n- Bond
- 1 piece of felt (cut to a four leaf clover)
- 1 14″ x 14″ pillow form
- 1 15″ x 15″ piece of fabric
- 1 15″ x 10″ piece of fabric
- 1 15″ x 8″ piece of fabric
- iron
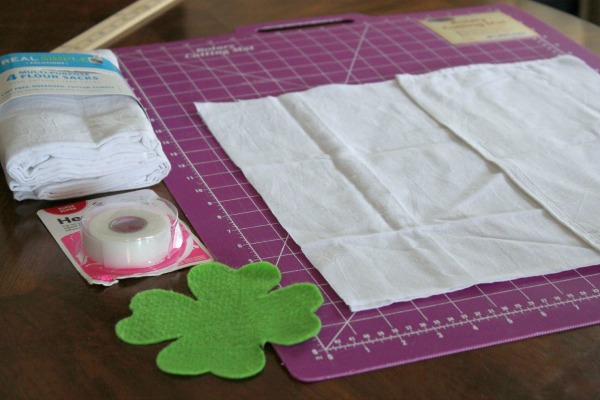
Step 1: Take your 15″ x 10″ and 15″ x 8″ pieces of fabric and iron them. I used flour sack towels as my fabric.
Step 2: Place your heat-n-bond strips along the outside edges of your 15″ x 15″ piece of fabric.
Step 3: Place your fabric pieces, the 15″ x 10″ and 15″ x 8″ pieces of fabric to make the perfect 15″ x 15″ square. Your pieces on top will overlap creating an envelope. Be sure to have the seams of the sack towards the middle.
Step 4: Iron the heat-n-bond pieces into place for a few minutes. Move all the way around the square until you have completely closed the pillow casing.
Step 5: Where the envelope portion is overlapping you will need to cut two little strips of heat-n-bond to place there and iron down.
Step 6: Place your hand inside the pillow and cut the corners. Be careful not to cut the heat-n-bond off.
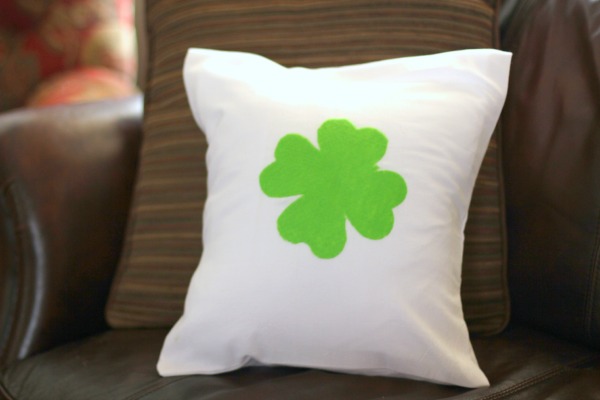
Step 7: Turn your pillowcase inside out. Place the clover in the middle of the pillowcase and adhere to the case using the Heat -n- Bond.
Step 8: Add your pillow form and your project is complete!
Do you need a better “visual” for this project? Well you are in LUCK (excuse the pun) because I also created a video tutorial showing you all of these steps. Now, you can also make this quick and easy no-sew pillow cover and watch everything step-by-step with instructions.
I always love quick and easy projects that turn out well and allow me to keep my space clean and ready for the next project.
I hope you enjoyed this quick and easy St. Patrick’s Day no-sew throw pillow, and make sure to check out the video I made to go along with the project!

ABOUT JENNIFER: Jennifer is the author of PinkWhen.com, a website that is focused on crafting, cooking, and creating. You can find easy to follow tutorials and recipes for numerous different projects. The mom to what she liken’s as “The Brady Bunch”, you can always find her posting daily and on social media. Sleep is the only thing she misses.
Follow Jennifer on Facebook | Twitter | Pinterest |Google+ | Instagram |
CONTINUE READING IN THE MOM CAVE
![]()